Excel出力(Apache POI)
外部ライブラリを使用するとExcelファイルの読み書きができます。Excelを取り扱うライブラリはいくつかありますが、最もメジャーと思われる、Apache POIをやります。
今回はExcelファイルを出力させますが、Servletでダウンロードさせる場合、こちらを参照ください。
ライブラリの取得
https://poi.apache.org/download.htmlでJarファイル(Zip)を取得します。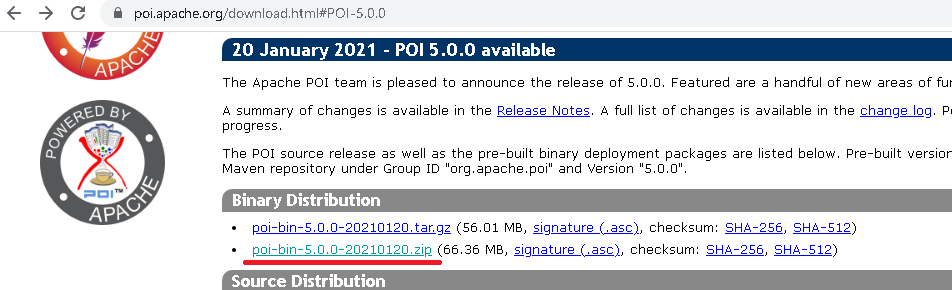
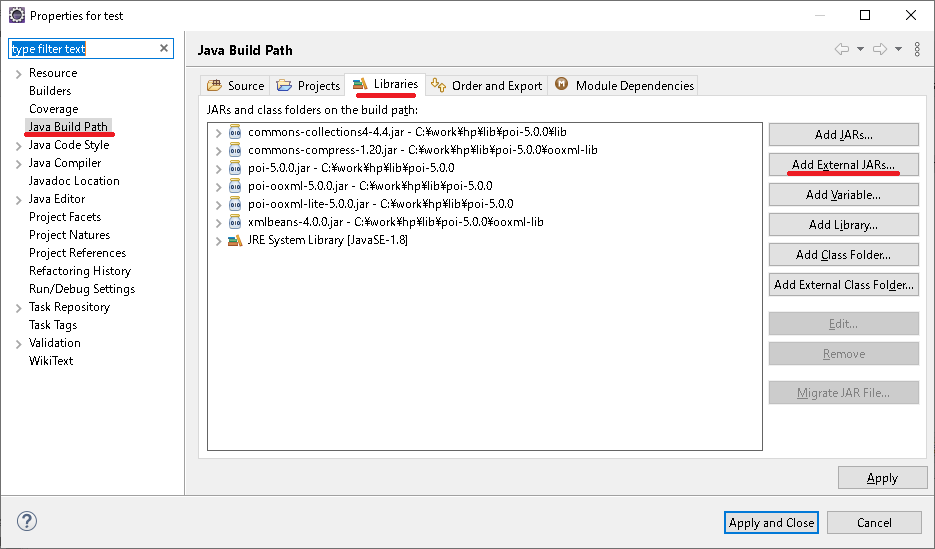
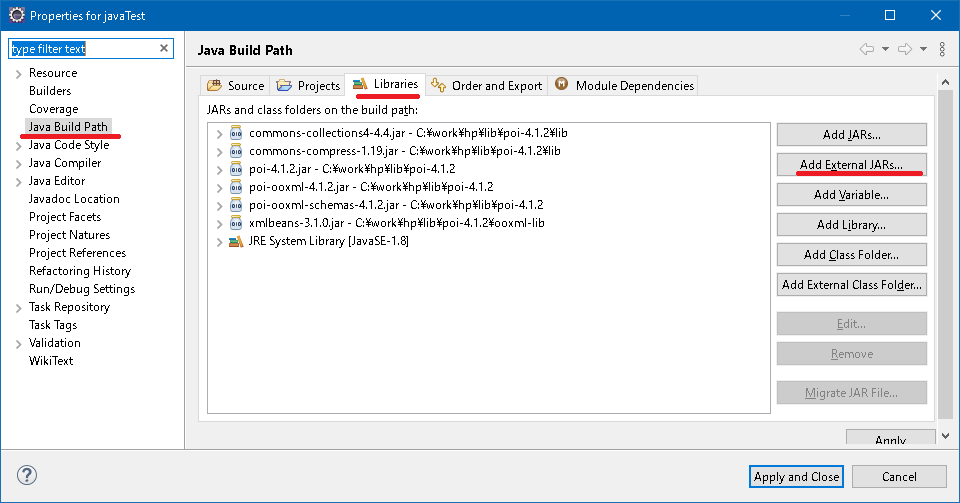
ビルドパス設定(Mavenを使用しない)
poiをダウンロード、解凍したときに含まれるJarファイルをビルドパスに含めてください。- poi
- poi-ooxml
- poi-ooxml-lite(ver 4ではpoi-ooxml-schemas)
- lib/commons-collections
- lib/commons-compress
- ooxml-lib/xmlbeans
ver 5の例
ver 4の例
Mavenの場合
		<dependency>
			<groupId>org.apache.poi</groupId>
			<artifactId>poi</artifactId>
			<version>5.0.0</version>
		</dependency>
		<dependency>
			<groupId>org.apache.poi</groupId>
			<artifactId>poi-ooxml</artifactId>
			<version>5.0.0</version>
		</dependency>
Mavenの場合、ビルドパスの設定は必要ありません。
単純なExcel読み込みサンプル
package test;

import java.io.FileOutputStream;

import org.apache.poi.ss.usermodel.Cell;
import org.apache.poi.ss.usermodel.Row;
import org.apache.poi.ss.usermodel.Sheet;
import org.apache.poi.ss.usermodel.Workbook;
import org.apache.poi.xssf.usermodel.XSSFWorkbook;

public class PoiTest {
	public static void main(String[] args) {

		// ワークブック作成
		Workbook book = new XSSFWorkbook();

		// シート作成
		Sheet sheet = book.createSheet("しーと");

		// 行作成
		Row row = sheet.createRow(0);

		// セル作成
		Cell cell = row.createCell(0);

		// セルに値セット
		cell.setCellValue("test");

		// ファイルに保存
		String filename = "C:\\work\\hp\\workbook.xlsx";

		try (FileOutputStream out = new FileOutputStream(filename);) {
			book.write(out);
			book.close();
		} catch (Exception e) {
			e.printStackTrace();
		}
	}
}
作成Excelイメージ(実際にはLibreOfficeのCalc)
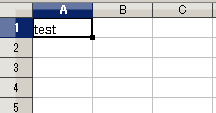
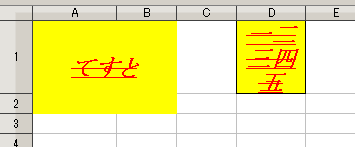
XSSFWorkbookでワークブックを作成し、createSheetでシートを作成します。
createRowで行を作成し、createCellでセルを作成します。両方とも開始は0になります。
値をセットするにはsetCellValueを使用します。
createSheetの引数ではシート名を指定できますが、省略することもできます。
フォント、スタイルなどを指定
package test;

import java.io.FileOutputStream;

import org.apache.poi.ss.usermodel.BorderStyle;
import org.apache.poi.ss.usermodel.Cell;
import org.apache.poi.ss.usermodel.CellStyle;
import org.apache.poi.ss.usermodel.FillPatternType;
import org.apache.poi.ss.usermodel.Font;
import org.apache.poi.ss.usermodel.HorizontalAlignment;
import org.apache.poi.ss.usermodel.IndexedColors;
import org.apache.poi.ss.usermodel.Row;
import org.apache.poi.ss.usermodel.Sheet;
import org.apache.poi.ss.usermodel.VerticalAlignment;
import org.apache.poi.ss.usermodel.Workbook;
import org.apache.poi.ss.util.CellRangeAddress;
import org.apache.poi.xssf.usermodel.XSSFWorkbook;

public class PoiTest {
	public static void main(String[] args) {

		// ワークブック作成
		Workbook book = new XSSFWorkbook();

		// シート作成
		Sheet sheet = book.createSheet("しーと");

		// 行作成
		Row row = sheet.createRow(0);

		// セル作成
		Cell cell = row.createCell(0);
		Cell cell2 = row.createCell(3);

		// セルに値セット
		cell.setCellValue("てすと");
		cell2.setCellValue("一二三四五");

		// フォントの作成
		Font font = book.createFont();

		// フォント名の指定
		font.setFontName("MS P明朝");

		// フォントサイズの指定
		font.setFontHeightInPoints((short) 18);

		// フォントの色の指定
		font.setColor(IndexedColors.RED.index);

		// 太字の指定
		// POI 4 より前のバージョン
		// font.setBoldweight(Font.BOLDWEIGHT_BOLD);
		// POI 4 以降
		font.setBold(true);

		// イタリックの指定
		font.setItalic(true);

		// アンダーラインの指定
		font.setUnderline(Font.U_SINGLE);

		// 取り消し線の指定
		font.setStrikeout(true);

		// スタイルの作成
		CellStyle style = book.createCellStyle();

		// フォントセット
		style.setFont(font);

		// 背景色の指定
		style.setFillForegroundColor(IndexedColors.YELLOW.index);
		// POI 4 より前のバージョン
		// style.setFillPattern(CellStyle.SOLID_FOREGROUND);
		// POI 4 以降
		style.setFillPattern(FillPatternType.SOLID_FOREGROUND);

		// 枠線の指定(上)
		// POI 4 より前のバージョン
		// style.setBorderTop(CellStyle.BORDER_THIN);
		// POI 4 以降
		style.setBorderTop(BorderStyle.THIN);

		// 枠線の指定(下)
		// POI 4 より前のバージョン
		// style.setBorderBottom(CellStyle.BORDER_THIN);
		// POI 4 以降
		style.setBorderBottom(BorderStyle.THIN);

		// 枠線の指定(左)
		// POI 4 より前のバージョン
		// style.setBorderLeft(CellStyle.BORDER_THIN);
		// POI 4 以降
		style.setBorderLeft(BorderStyle.THIN);

		// 枠線の指定(右)
		// POI 4 より前のバージョン
		// style.setBorderRight(CellStyle.BORDER_THIN);
		// POI 4 以降
		style.setBorderRight(BorderStyle.THIN);

		// 横位置-中央
		// POI 4 より前のバージョン
		// style.setAlignment(CellStyle.ALIGN_CENTER);
		// POI 4 以降
		style.setAlignment(HorizontalAlignment.CENTER);

		// 縦位置-中央
		// POI 4 より前のバージョン
		// style.setVerticalAlignment(CellStyle.VERTICAL_CENTER);
		// POI 4 以降
		style.setVerticalAlignment(VerticalAlignment.CENTER);

		// セルにスタイルのセット
		cell.setCellStyle(style);

		// 改行
		style.setWrapText(true);

		cell2.setCellStyle(style);

		// 行の高さ指定
		row.setHeightInPoints(55);

		// 列の幅指定
		sheet.setColumnWidth(3, 256 * 10);

		// 幅の自動調整
		// sheet.autoSizeColumn(0);

		// セルを結合する
		sheet.addMergedRegion(new CellRangeAddress(0, 1, 0, 1));

		// ファイルに保存
		String filename = "C:\\work\\hp\\workbook.xlsx";

		try (FileOutputStream out = new FileOutputStream(filename);) {
			book.write(out);
			book.close();
		} catch (Exception e) {
			e.printStackTrace();
		}
	}
}
作成Excelイメージ(実際にはLibreOfficeのCalc)
フォントの指定
// フォントの作成
Font font = book.createFont();

// フォント名の指定
font.setFontName("MS P明朝");

// フォントサイズの指定
font.setFontHeightInPoints((short) 18);

// フォントの色の指定
font.setColor(IndexedColors.YELLOW.index);

// スタイルの作成
CellStyle style = book.createCellStyle();

// フォントセット
style.setFont(font);
フォントはワークブックより作成します。フォント名は以下のようなものがあります。
- MS Pゴシック
- MS ゴシック
- MS P明朝
- MS 明朝
- MS UI Gothic
- メイリオ
- ・・・省略
- AQUA
- AUTOMATIC
- BLACK
- BLUE
- BLUE_GREY
- BRIGHT_GREEN
- BROWN
- CORAL
- CORNFLOWER_BLUE
- DARK_BLUE
- DARK_GREEN
- DARK_RED
- DARK_TEAL
- DARK_YELLOW
- GOLD
- GREEN
- GREY_25_PERCENT
- GREY_40_PERCENT
- GREY_50_PERCENT
- GREY_80_PERCENT
- INDIGO
- LAVENDER
- LEMON_CHIFFON
- LIGHT_BLUE
- LIGHT_CORNFLOWER_BLUE
- LIGHT_GREEN
- LIGHT_ORANGE
- LIGHT_TURQUOISE
- LIGHT_YELLOW
- LIME
- MAROON
- OLIVE_GREEN
- ORANGE
- ORCHID
- PALE_BLUE
- PINK
- PLUM
- RED
- ROSE
- ROYAL_BLUE
- SEA_GREEN
- SKY_BLUE
- TAN
- TEAL
- TURQUOISE
- VIOLET
- WHITE
- YELLOW
フォントスタイルの指定
// フォントの作成
Font font = book.createFont();

// 太字の指定
// POI 4 より前のバージョン
// font.setBoldweight(Font.BOLDWEIGHT_BOLD);
// POI 4 以降
font.setBold(true);

// イタリックの指定
font.setItalic(true);

// アンダーラインの指定
font.setUnderline(Font.U_SINGLE);

// 取り消し線の指定
font.setStrikeout(true);

// スタイルの作成
CellStyle style = book.createCellStyle();

// フォントセット
style.setFont(font);
セルスタイルの指定
// スタイルの作成
CellStyle style = book.createCellStyle();

// 背景色の指定
style.setFillForegroundColor(IndexedColors.YELLOW.index);
// POI 4 より前のバージョン
// style.setFillPattern(CellStyle.SOLID_FOREGROUND);
// POI 4 以降
style.setFillPattern(FillPatternType.SOLID_FOREGROUND);

// 枠線の指定(上)
// POI 4 より前のバージョン
// style.setBorderTop(CellStyle.BORDER_THIN);
// POI 4 以降
style.setBorderTop(BorderStyle.THIN);

// 枠線の指定(下)
// POI 4 より前のバージョン
// style.setBorderBottom(CellStyle.BORDER_THIN);
// POI 4 以降
style.setBorderBottom(BorderStyle.THIN);

// 枠線の指定(左)
// POI 4 より前のバージョン
// style.setBorderLeft(CellStyle.BORDER_THIN);
// POI 4 以降
style.setBorderLeft(BorderStyle.THIN);

// 枠線の指定(右)
// POI 4 より前のバージョン
// style.setBorderRight(CellStyle.BORDER_THIN);
// POI 4 以降
style.setBorderRight(BorderStyle.THIN);

// 横位置-中央
// POI 4 より前のバージョン
// style.setAlignment(CellStyle.ALIGN_CENTER);
// POI 4 以降
style.setAlignment(HorizontalAlignment.CENTER);

// 縦位置-中央
// POI 4 より前のバージョン
// style.setVerticalAlignment(CellStyle.VERTICAL_CENTER);
// POI 4 以降
style.setVerticalAlignment(VerticalAlignment.CENTER);

// 改行
style.setWrapText(true);

// セルにスタイルのセット
cell.setCellStyle(style);
背景色の指定はフォント色と同じです。
setWrapTextにtrueを指定すると文字列が長くなったときに自動的に改行されます。
シート、行、列を隠す
package test;

import java.io.FileOutputStream;

import org.apache.poi.ss.usermodel.Cell;
import org.apache.poi.ss.usermodel.Row;
import org.apache.poi.ss.usermodel.Sheet;
import org.apache.poi.ss.usermodel.Workbook;
import org.apache.poi.xssf.usermodel.XSSFWorkbook;

public class PoiTest {
	public static void main(String[] args) {

		// ワークブック作成
		Workbook book = new XSSFWorkbook();

		// シート作成
		Sheet sheet = book.createSheet("しーと");
		book.createSheet("しーと2");

		// 行作成
		Row row0 = sheet.createRow(0);
		Row row1 = sheet.createRow(1);
		// セル作成
		Cell cell0 = row0.createCell(0);
		Cell cell1 = row1.createCell(1);

		// セルに値セット
		cell0.setCellValue("test0");
		cell1.setCellValue("test1");

		// シートを隠す(0~を指定。しーと2を隠す)
		book.setSheetHidden(1, true);

		// 列を隠す(0~を指定。A列を隠す)
		sheet.setColumnHidden(0, true);

		// 行を隠す
		row1.setZeroHeight(true);

		// ファイルに保存
		String filename = "C:\\work\\hp\\workbook.xlsx";

		try (FileOutputStream out = new FileOutputStream(filename);) {
			book.write(out);
			book.close();
		} catch (Exception e) {
			e.printStackTrace();
		}
	}
}
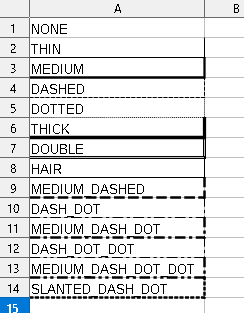
線
線を全種類出力するサンプルになります。
import java.io.FileOutputStream;

import org.apache.poi.ss.usermodel.BorderStyle;
import org.apache.poi.ss.usermodel.Cell;
import org.apache.poi.ss.usermodel.CellStyle;
import org.apache.poi.ss.usermodel.Row;
import org.apache.poi.ss.usermodel.Sheet;
import org.apache.poi.ss.usermodel.Workbook;
import org.apache.poi.xssf.usermodel.XSSFWorkbook;

public class test2 {

	public static void main(String[] args) {

		Workbook book = new XSSFWorkbook();

		Sheet sheet = book.createSheet("しーと");

		int idx = 0;
		for (BorderStyle borderStyle : BorderStyle.values()) {
			writeLine(book, sheet, borderStyle, idx++);
		}

		String filename = "C:\\work\\hp\\workbook.xlsx";

		try (FileOutputStream out = new FileOutputStream(filename);) {
			book.write(out);
			book.close();
		} catch (Exception e) {
			e.printStackTrace();
		}
	}

	public static void writeLine(Workbook book, Sheet sheet, BorderStyle borderStyle, int idx) {

		Row row = sheet.createRow(idx);

		Cell cell = row.createCell(0);
		cell.setCellValue(borderStyle.name());

		CellStyle style = book.createCellStyle();
		style.setBorderBottom(borderStyle);
		style.setBorderRight(borderStyle);
		cell.setCellStyle(style);
	}

}
線に指定できる値とその表示イメージは以下になります(LibreOffice で表示)
その他の設定
// シート作成
Sheet sheet = book.createSheet("しーと");

// 行作成
Row row = sheet.createRow(0);

// 行の高さ指定
row.setHeightInPoints(55);

// 列の幅指定
sheet.setColumnWidth(3, 256 * 10);

// 幅の自動調整
sheet.autoSizeColumn(0);

// セルを結合する
sheet.addMergedRegion(new CellRangeAddress(0, 1, 0, 1));
CellRangeAddressは結合する範囲を指定します(開始行, 終了行, 開始列,
終了列)。
ページのトップへ戻る