AngularJS Component Router
今回はComponent Routerをやります。Component Routerは画面遷移を制御してくれます。通常のWEBページではリンクやボタンをクリックしたときなど、
表示が切り替わる部分は一部でも、画面全体を読み込み直すことが多いと思いますが、Component Routerでは
指定した場所のComponentのみを入れ替えてくれます。
Hashモード
HTML5モード
コンポーネント間で連携
Hashモードサンプル
<!DOCTYPE html>
<html>

<head>
	<meta charset="UTF-8">
	<title>AngularJS Test</title>
	<script src="https://ajax.googleapis.com/ajax/libs/angularjs/1.5.3/angular.min.js"></script>
	<!-- script src="angular.min.js"></script -->
	<script src="https://npmcdn.com/@angular/router@0.2.0/angular1/angular_1_router.js"></script>
	<!-- script src="angular_1_router.js"></script -->
	<script>
		var testApp = angular.module("testApp", ['ngComponentRouter']);

		testApp.value('$routerRootComponent', 'hello');

		testApp.component('word', {
			template: '<h1>Hello World!!</h1>'
		});

		testApp.component('clr', {
			template: ''
		});

		testApp.component("hello", {
			template: '<a ng-link="[\'ClickHello\']">Click</a> ' +
				'<a ng-link="[\'ClickClear\']">Clear</a><ng-outlet></ng-outlet>',
			$routeConfig: [{
				path: '/hi',
				name: 'ClickHello',
				component: 'word'
			}, {
				path: '/cl',
				name: 'ClickClear',
				component: 'clr'
			}]
		});
	</script>
</head>

<body ng-app="testApp">
	<hello></hello>
</body>

</html>
実行イメージ 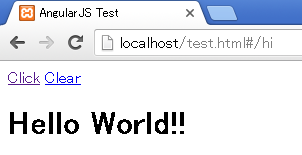
ngComponentRouter
Component Routerを使用するには、moduleメソッドで依存するモジュールにngComponentRouterモジュールを指定します。
var testApp = angular.module("testApp", ['ngComponentRouter']);
$routerRootComponent
moduleメソッドで作成したモジュールにvalueメソッドでトップレベルとなるコンポーネントを指定します。コンポーネントを指定するときのキーとなる文字列が"$routerRootComponent"になります。
// JavaScript
testApp.value('$routerRootComponent', 'hello');

<!-- HTML Tag -->
<body ng-app="testApp">
	<hello></hello>
</body>
ng-link、ng-outlet、$routeConfig
ng-linkがリンクとなり、クリックされたときに$routeConfigのnameが一致するコンポーネントをng-outletの場所に表示します。$routeConfigのpathにはブラウザのロケーションバーに表示する文字列を指定します。pathは重複しないように指定して下さい。
testApp.component("hello", {
	template: '<a ng-link="[\'ClickHello\']">Click</a> ' +
		'<a ng-link="[\'ClickClear\']">Clear</a><ng-outlet></ng-outlet>',
	$routeConfig: [{
		path: '/hi',
		name: 'ClickHello',
		component: 'word'
	}, {
		path: '/cl',
		name: 'ClickClear',
		component: 'clr'
	}]
});
ページのトップへ戻る
HTML5モードサンプル
<!DOCTYPE html>
<html>

<head>
	<meta charset="UTF-8">
	<title>AngularJS Test</title>
	<script src="https://ajax.googleapis.com/ajax/libs/angularjs/1.5.3/angular.min.js"></script>
	<!-- script src="angular.min.js"></script -->
	<script src="https://npmcdn.com/@angular/router@0.2.0/angular1/angular_1_router.js"></script>
	<!-- script src="angular_1_router.js"></script -->
	<script>
		var testApp = angular.module("testApp", ['ngComponentRouter']);

		var element = document.createElement("base");
		element.setAttribute("href", window.location.pathname);
		document.getElementsByTagName("head")[0].appendChild(element);

		testApp.config(['$locationProvider', function($locationProvider) {
			$locationProvider.html5Mode(true);
		}]);

		testApp.value('$routerRootComponent', 'hello');

		testApp.component('word', {
			template: '<h1>Hello World!!</h1>'
		});
		testApp.component('clr', {
			template: ''
		});

		testApp.component("hello", {
			template: '<a ng-link="[\'ClickHello\']">Click</a> ' +
				'<a ng-link="[\'ClickClear\']">Clear</a><ng-outlet></ng-outlet>',
			$routeConfig: [{
				path: '/hi',
				name: 'ClickHello',
				component: 'word'
			}, {
				path: '/cl',
				name: 'ClickClear',
				component: 'clr'
			}]
		});
	</script>
</head>

<body ng-app="testApp">
	<hello></hello>
</body>

</html>
実行イメージ 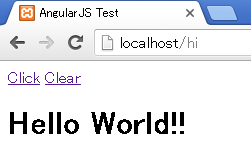
HashモードとHTML5モード
Component Routerは画面全体の遷移はせず一部のコンポーネントを入れ替えるだけなので、画面遷移履歴は残らなそうですが、実は残ります。HashモードとHTML5モード違いは、この履歴の残り方が違います。
■Hashモードの場合
http://localhost/test.html#/hi


■HTML5モードの場合
http://localhost/hi
ネットで調べるとHashモードよりHTML5モードを使用した方が良いという意見が多いように見えます。 HTML5モードに変更
Ver1.5では、デフォルトはHashモードになります。HTML5モードに切り替えるには、headタグ内にbaseタグを追加し、$locationProviderのhtml5Modeメソッドでtrueを指定します。
<!-- HTML Tag -->
<head>
<base href="/" />
~
</head>

// JavaScript
モジュール.config(['$locationProvider', function($locationProvider) {
	$locationProvider.html5Mode(true);
}]);
baseタグで指定するURLは全体の基準となるURLになります。ルートで動作確認する場合は上記の例と同じで良いですが、/work/など動作確認する
場所に書き換えて下さい。どこになるかわからない場合、以下のようにJavaScriptで要素を作成することもできます。
(上記サンプルはこれで作成しています)。
var element = document.createElement("base");
element.setAttribute("href", window.location.pathname);
document.getElementsByTagName("head")[0].appendChild(element);
ページのトップへ戻る
コンポーネント間で連携
<!DOCTYPE html>
<html>

<head>
	<meta charset="UTF-8">
	<title>AngularJS Test</title>
	<script src="https://ajax.googleapis.com/ajax/libs/angularjs/1.5.3/angular.min.js"></script>
	<!-- script src="angular.min.js"></script -->
	<script src="https://npmcdn.com/@angular/router@0.2.0/angular1/angular_1_router.js"></script>
	<!-- script src="angular_1_router.js"></script -->
	<script>
		var testApp = angular.module("testApp", ['ngComponentRouter']);

		var element = document.createElement("base");
		element.setAttribute("href", window.location.pathname);
		document.getElementsByTagName("head")[0].appendChild(element);

		testApp.config(['$locationProvider', function($locationProvider) {
			$locationProvider.html5Mode(true);
		}]);

		testApp.value('$routerRootComponent', 'hello');

		function getIndex(fruits, cd) {
			for (var i = 0; i < fruits.length; i++) {
				if (fruits[i].cd == cd) {
					return i;
				}
			}
			return -1;
		}

		testApp.component('list', {
			template: 'Name ' +
				  '<div ng-repeat="tgt in $ctrl.prntCtrl.fruits">\n' +
				  '  <a ng-link="[\'DetailName\', {cd: tgt.cd}]">{{tgt.name}}</a>\n' +
				  '</div>' +
				  '<br />' +
				  '<button ng-click="$ctrl.add()">Add</button>\n',
			bindings: {
				$router: '<'
			},
			require: {
				prntCtrl: '^hello'
			},
			controller: ListComponent
		})

		function ListComponent() {
			this.add = function() {
				this.$router.navigate(['DetailName']);
			};
		}

		testApp.component('detail', {
			template: ' <div ng-if="$ctrl.mode == \'UPD\'">\n' +
				  '  <label>Cd: </label>{{$ctrl.target.cd}}</div>\n' +
				  ' </div>\n' +
				  ' <div ng-if="$ctrl.mode == \'ADD\'">\n' +
				  '  <label>Cd: </label><input ng-model="$ctrl.target.cd" />\n' +
				  ' </div>\n' +
				  ' <div>\n' +
				  '  <label>Name: </label>\n' +
				  '  <input ng-model="$ctrl.target.name" />\n' +
				  ' </div><br />\n' +
				  ' <button ng-if="$ctrl.mode == \'ADD\'" ng-click="$ctrl.add()">Add</button>\n' +
				  ' <button ng-if="$ctrl.mode == \'UPD\'" ng-click="$ctrl.update()">Update</button>\n' +
				  ' <button ng-if="$ctrl.mode == \'UPD\'" ng-click="$ctrl.delete()">Delete</button>\n',
			bindings: {
				$router: '<'
			},
			require: {
				prntCtrl: '^hello'
			},
			controller: DetailComponent
		});

		function DetailComponent() {
			this.$routerOnActivate = function(next, previous) {
				this.mode = "ADD";
				var idx = getIndex(this.prntCtrl.fruits, next.params.cd);
				if (idx != -1) {
					this.target = this.prntCtrl.fruits[idx];
					this.mode = "UPD";
				}
			};
			this.update = function() {
				this.$router.navigate(['ListName']);
			};
			this.add = function() {
				this.prntCtrl.fruits.push({
					cd: this.target.cd,
					name: this.target.name
				});
				this.$router.navigate(['ListName']);
			};
			this.delete = function() {
				var idx = getIndex(this.prntCtrl.fruits, this.target.cd);
				if (idx != -1) {
					this.prntCtrl.fruits.splice(idx, 1);
				}

				this.$router.navigate(['ListName']);
			};
		}

		function parentCtrl() {
			this.fruits = [{
				cd: 'bnn',
				name: 'Banana'
			}, {
				cd: 'apl',
				name: 'Apple'
			}];
		}
		testApp.component("hello", {
			template: '<ng-outlet></ng-outlet>',
			$routeConfig: [{
				path: '/test.html',
				name: 'ListName',
				component: 'list'
			}, {
				path: '/cl',
				name: 'DetailName',
				component: 'detail'
			}],
			controller: parentCtrl
		});
	</script>
</head>

<body ng-app="testApp">
	<hello></hello>
</body>

</html>
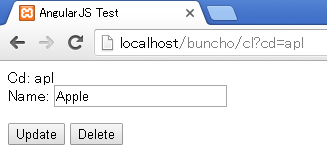
実行イメージ 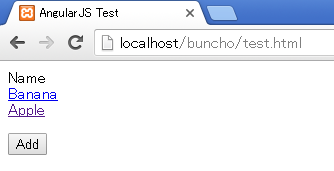
requireを使用して親子間のコンポーネントのコントローラを共有しています。requireについてはcomponentを参照して下さい。
$router.navigate
コンポーネントにリンクを貼るときはng-linkを使いましたが、ロジック側でコンポーネントを切り替えるときは、$router.navigateメソッドを使用します。引数の指定はng-linkと同様になります。
$routerを使用するには、bindingsでオブジェクト連携する必要があります。
//componentでオブジェクト連携指定
bindings: {
	$router: '<'
},

//リンク実行
this.$router.navigate(['ListName']);
$routerOnActivate
コンポーネントが表示される前に呼ばれます。引数のparamsプロパティよりコンポーネント切り替え前後の属性値を取得できます。
this.$routerOnActivate = function(next, previous) {
	this.mode = "ADD";
	var idx = getIndex(this.prntCtrl.fruits, next.params.cd);
	if (idx != -1) {
		this.target = this.prntCtrl.fruits[idx];
		this.mode = "UPD";
	}
};
ページのトップへ戻る