Angular 親子関係
親子関係を作って、連携してみます。入力項目の続きからやるので、環境がない場合、そちらを参考に環境構築してください。
シグナルにここで書いたサンプルをシグナルに置き換えたサンプルがあります。
親から子に連携
Angular CLIで子コンポーネントを作成。
ng generate component child
app\child\child.component.ts
@Input()で親からのデータを受け取ります。シグナル版はこちら
import { Component } from '@angular/core';
import { Input } from '@angular/core';
@Component({
  selector: 'app-child',
  template:
    `<h1>{{childMsg}}</h1>`
})
export class ChildComponent {
  @Input() childMsg: String = '';
}
src\app\app.component.ts
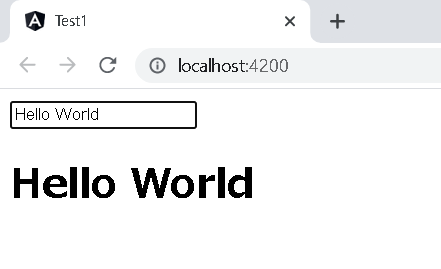
入力項目で作成したコンポーネントを親コンポーネントに変更。
import { Component } from '@angular/core';
import { ChildComponent } from './child/child.component';

@Component({
  selector: 'app-root',
  imports: [ChildComponent],
  template:
    `<input #hello (keyup)="keyupEvent(hello.value)" placeholder="ここに入力" />
    <app-child [childMsg]="parentMsg"></app-child>`
})
export class AppComponent {

  parentMsg = "ここに表示されます。";

  keyupEvent(value: string) {
    this.parentMsg = value;
  }
}
実行イメージ
子から親に連携
app\child\child.component.ts
@Output()で親にデータを送ります。送るときはEventEmitter送り、$eventで受け取ります。
import { Component, Output, EventEmitter } from '@angular/core';
@Component({
  selector: 'app-child',
  template:
    `<input #hello (keyup)="keyupEvent(hello.value)" placeholder="ここに入力" />`
})
export class ChildComponent {
  @Output() childOutput = new EventEmitter<String>();

  keyupEvent(childMsg: string) {
    this.childOutput.emit(childMsg);
  }
}
EventEmitterオブジェクトの生成+@Output()指定はoutput()関数に置き換えることができます。
import { Component, output } from '@angular/core';
@Component({
  selector: 'app-child',
  template:
    `<input #hello (keyup)="keyupEvent(hello.value)" placeholder="ここに入力" />`
})
export class ChildComponent {
  childOutput = output<string>();

  keyupEvent(childMsg: string) {
    this.childOutput.emit(childMsg);
  }
}
src\app\app.component.ts
import { Component } from '@angular/core';
import { ChildComponent } from './child/child.component';

@Component({
  selector: 'app-root',
  imports: [ChildComponent],
  template:
    `<app-child (childOutput)="call($event)"></app-child>
    <h1>{{parentMsg}}</h1>`
})
export class AppComponent {

  parentMsg: String = "ここに表示されます。";

  call(childMsg: String) {
    this.parentMsg = childMsg;
  }
}
実行イメージ
子と親の連携(@Output()で属性名にChangeを付ける)
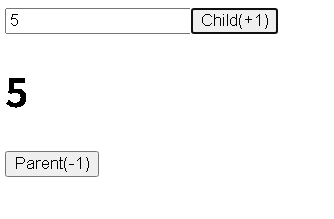
@Output()の属性名にChangeを付けるとその属性で双方向バインディングできますシグナル版はこちら
app\child\child.component.ts
import { Component, Input, Output, EventEmitter } from '@angular/core';
@Component({
  selector: 'app-child',
  template:
    `<input [value]="childVal" />
    <button (click)="clickPlus()">Child(+1)</button>
    `
})
export class ChildComponent {

  @Input() childVal?: number;
  @Output() childValChange = new EventEmitter<number>();

  clickPlus() {

    if (this.childVal != undefined) {
      this.childVal = this.childVal + 1;
    }
    this.childValChange.emit(this.childVal);
  }
}
src\app\app.component.ts
import { Component } from '@angular/core';
import { ChildComponent } from './child/child.component';

@Component({
  selector: 'app-root',
  imports: [ChildComponent],
  template:
    `<app-child [(childVal)]="parentVal"></app-child>
    <h1>{{parentVal}}</h1>
    <button (click)="clickMinus()">Parent(-1)</button>
    `
})
export class AppComponent {

  parentVal = 1;

  clickMinus() {

    this.parentVal = this.parentVal - 1;
  }

}
ページのトップへ戻る