Angular 入力項目
今回はAngular2の入力項目をやります。入力した文字をそのまま画面に表示してみます。Angular CLIの作成したものをベースに一部を変更するので、実際動かす場合は、Angular CLIのソースも作成して下さい。
テキスト入力イベント
Angular CLIでプロジェクト作成後、src\app\app.component.tsを以下のように変更します。src\app\app.component.ts
import { Component } from '@angular/core';
@Component({
selector: 'app-root',
template:
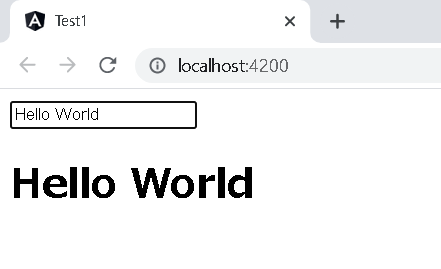
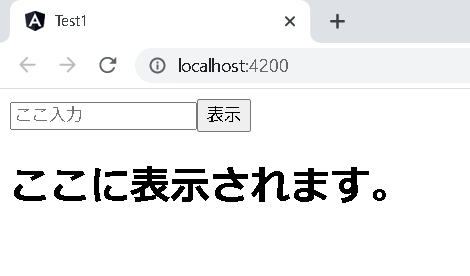
`<input #hello (keyup)="keyupEvent(hello.value)" placeholder="ここに入力" />
<h1>{{message}}</h1>`
})
export class AppComponent {
message = "ここに表示されます。";
keyupEvent(value: string) {
this.message = value;
}
}
#helloをテンプレート参照変数と言います。
上記変更後、プロジェクトフォルダで以下を実行すると動作確認できます。
ng serve --open
実行イメージ
①画面表示時

②文字入力後
イベントは色々ありますが、例えば以下のようなものがあります。
イベント
| イベント | 動作 |
|---|---|
| (click) | クリックされた |
| (keyup) | キーボタンが押された |
| (keyup.enter) | エンターキーボタンが押された |
| (blur) | フォーカスが外された |
ボタンイベント
src\app\app.component.ts
import { Component } from '@angular/core';

@Component({
  selector: 'app-root',
  template:
    `<input #hello placeholder="ここに何か入力して下さい。" />
     <button (click)="clickEvent(hello.value)">表示</button>
     <h1>{{message}}</h1>`
})
export class AppComponent {

  message = "ここに表示されます。";

  clickEvent(value: string) {
    this.message = value;
  }
}
実行イメージ
リスト作成
import { Component } from '@angular/core';
@Component({
selector: 'app-root',
template:
`
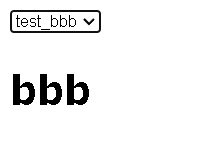
<select #cmb (change)="onChange(cmb.value)">
<option *ngFor="let str of ary" value={{str}}>test_{{str}}</option>
</select>
<h1>{{message}}</h1>
`
})
export class AppComponent {
message = "ここに表示されます。";
ary = ["aaa", "bbb", "ccc"];
onChange(value: string) {
this.message = value;
}
}
実行イメージ
ページのトップへ戻る