SpringBoot 設定
今回は設定をやります。前回の続きからやるので、環境設定等は前回を参照下さい。component-scan
アノテーションで書いたように、Springはcomponent-scanで設定したパッケージ以下にあるアノテーションが付いているクラスを読み込みます。(前回のようにmainメソッド配下のパッケージも読み込みます)
Springでは設定ファイルでcomponent-scanを指定して該当クラスを読み込ませていましたが、SpringBootでは@ComponentScanアノテーションを使用するか、 @SpringBootApplicationで指定します。
DemoApplication .java
package com.example.demo;

import org.springframework.boot.SpringApplication;
import org.springframework.boot.autoconfigure.SpringBootApplication;
import org.springframework.context.annotation.ComponentScan;

@ComponentScan("spring.test")
@SpringBootApplication
public class DemoApplication {

	public static void main(String[] args) {
		SpringApplication.run(DemoApplication.class, args);
	}

}
TestController.java
package spring.test;

import static org.springframework.web.bind.annotation.RequestMethod.GET;

import org.springframework.stereotype.Controller;
import org.springframework.web.bind.annotation.RequestMapping;

@Controller
public class TestController {

	@RequestMapping(value = "/", method = GET)
	public String show() {
		return "test";
	}
}
宣言方法のいろいろ
	// これを宣言したパッケージとその配下にあるパッケージ
	@ComponentScan

	// spring.testとその配下にあるパッケージ
	@ComponentScan("spring.test")

	// spring.test1、spring.test2とその配下にあるパッケージ
	@ComponentScan({"spring.test1", "spring.test2"})

	// @ComponentScanも含まれるので@ComponentScanと同じ
	@SpringBootApplication

	// spring.testとその配下にあるパッケージ
	@SpringBootApplication(scanBasePackages={"spring.test"})
外部設定値の読み込み
次に外部にある設定ファイルの設定値を読み込んでみます。今回は、@Valueアノテーションを使って直接設定ファイルを読み込む方式と @ConfigurationPropertiesアノテーションを使って設定ファイルとクラスに紐付ける方式をやります。TestController.java
package spring.test;

import static org.springframework.web.bind.annotation.RequestMethod.GET;

import org.springframework.beans.factory.annotation.Autowired;
import org.springframework.beans.factory.annotation.Value;
import org.springframework.stereotype.Controller;
import org.springframework.web.bind.annotation.RequestMapping;

@Controller
public class TestController {

	@Autowired
	TestConfig testConfig;

	@Value("${test.hello:DEFAULT}")
	String str;

	@RequestMapping(value = "/", method = GET)
	public String show() {

		// worldが出力される
		System.out.println(testConfig.getHello());

		// こっちもworldが出力される
		System.out.println(str);

		return "test";
	}
}
TestConfig.java
package spring.test;

import org.springframework.boot.context.properties.ConfigurationProperties;
import org.springframework.stereotype.Component;

@Component
@ConfigurationProperties("test")
public class TestConfig {
	private String hello;

	public String getHello() {
		return hello;
	}

	public void setHello(String hello) {
		this.hello = hello;
	}
}
application.properties
test.hello=world
@Valueアノテーションは @Value("${設定項目名:デフォルト値}") のように記述します。
@ConfigurationPropertiesアノテーションは @ConfigurationProperties("設定項目名の頭") のように記述し、 クラス内の変数名(setterが必要)に項目名をつけます。
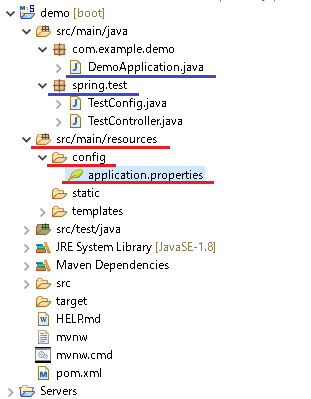
ファイル構成は以下のようになります。
Thymeleafキャッシュ
SpringMVCでJspファイルを修正したときは、Tomcatを再起動しないで修正が反映されましたが、Thymeleafはデフォルトではそのような動作をしません。
同じような動作をさせるにはapplication.propertiesに以下の設定を追加します。
application.properties
spring.thymeleaf.cache=false
ページのトップへ戻る