SpringBoot Thymeleaf 基本
今回はThymeleafをやります。前回の続きからやるので、環境設定等は前回を参照下さい。フォームでデータのやり取り
データを連携するための単純なクラス。UserModel.java
package spring.test;

public class UserModel {
	String id;
	String name;

	public String getId() {
		return id;
	}

	public void setId(String id) {
		this.id = id;
	}

	public String getName() {
		return name;
	}

	public void setName(String name) {
		this.name = name;
	}
}
Thymeleafからアクセスされるコントローラクラス。
LoginControler.java
package spring.test.controller;

import org.springframework.stereotype.Controller;
import org.springframework.web.bind.annotation.ModelAttribute;
import org.springframework.web.bind.annotation.RequestMapping;
import org.springframework.web.bind.annotation.RequestMethod;
import org.springframework.web.servlet.ModelAndView;

import spring.test.UserModel;

@Controller
@RequestMapping(value = "/login")
public class LoginControler {

	@RequestMapping(method = RequestMethod.GET)
	public String loginGet(@ModelAttribute("UM") UserModel userModel) {
		userModel.setId("初期値");
		return "login";
	}

	@RequestMapping(method = RequestMethod.POST)
	public ModelAndView loginPost(@ModelAttribute("UM") UserModel userModel) {

		String id = userModel.getId();
		ModelAndView mv = new ModelAndView("login");
		if (id.equals("abc")) {
			userModel.setName("ABCさん");
			mv.addObject("msg", "ログイン成功");
		} else {
			userModel.setName("");
			mv.addObject("msg", "ログイン失敗");
		}
		return mv;
	}
}
Thymeleafで書かれたHTMLファイル。
login.html
<!DOCTYPE html>
<html xmlns:th="http://www.thymeleaf.org">
<head>
<meta charset="UTF-8">
<title>ログイン</title>
</head>
<body>
	<form th:action="@{/login}" method="post" th:object="${UM}">

		ID: <input type="text" th:field="*{id}" />
		<input type="text" th:field="*{name}" disabled />
		<BR />
		<input type="submit" value="ログイン" />
		<BR />
	</form>
	<span th:text="${msg}"></span>
</body>
</html>
| 記号 | 説明 |
|---|---|
| $ | JavaとThymeleafでデータを連携させる |
| * | $で連携されたオブジェクトのフィールド連携させる |
| @ | URLを環境にあった形に変換してくれる |
| # | メッセージソースを表示。 ユーティリティオブジェクト。 |
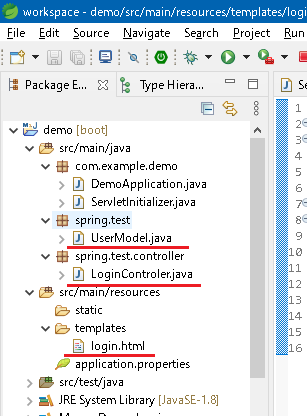
ファイル構成は以下のようになります。
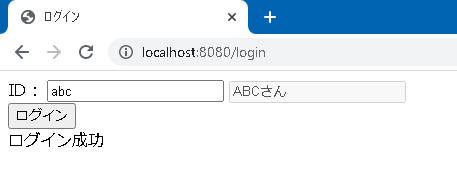
http://localhost:8080/loginにアクセスすると 以下の画面が表示され「abc」でログイン成功と表示されます 。
リスト、マップ
リスト、マップの受け渡しを確認します。LoginControler.javaの中身を以下のように変更します。LoginControler.java
package spring.test.controller;

import java.util.ArrayList;
import java.util.HashMap;
import java.util.List;
import java.util.Map;

import org.springframework.stereotype.Controller;
import org.springframework.web.bind.annotation.RequestMapping;
import org.springframework.web.bind.annotation.RequestMethod;
import org.springframework.web.servlet.ModelAndView;

import spring.test.UserModel;

@Controller
@RequestMapping(value = "/login")
public class LoginControler {

	@RequestMapping(method = RequestMethod.GET)
	public ModelAndView loginGet() {

		ModelAndView mv = new ModelAndView("login");

		List<String> ary = new ArrayList<>();
		Map<String, String> map = new HashMap<>();
		Map<String, String> map2 = new HashMap<>();
		List<Map<String, String>> aryMap = new ArrayList<>();
		List<UserModel> aryUser = new ArrayList<>();

		ary.add("ary1");
		ary.add("ary2");

		map.put("key1", "val1");
		map.put("key2", "val2");

		map2.put("key1", "val21");
		map2.put("key2", "val22");

		aryMap.add(map);
		aryMap.add(map2);

		UserModel user = new UserModel();
		user.setId("id1");
		user.setName("name1");

		aryUser.add(user);

		mv.addObject("ary", ary);
		mv.addObject("map", map);
		mv.addObject("aryMap", aryMap);
		mv.addObject("aryUser", aryUser);

		return mv;
	}
}
test.htmlの中身を以下のように変更します。
test.html
<!DOCTYPE html>
<html xmlns:th="http://www.thymeleaf.org">
<head>
<meta charset="UTF-8">
<title>ログイン</title>
</head>
<body>
	<table>
		<tr th:each="str : ${ary}">
			<td th:text="${str}"></td>
		</tr>
	</table>
	<table>
		<tr th:each="element : ${map}">
			<td th:text="${element.key}"></td>
			<td th:text="${element.value}"></td>
		</tr>
	</table>
	<table>
		<tr th:each="element : ${map}" th:object="${element}">
			<td th:text="*{key}"></td>
			<td th:text="*{value}"></td>
		</tr>
	</table>
	<table>
		<tr th:each="element : ${aryMap}" >
			<td th:text="${element.key1}"></td>
			<td th:text="${element.key2}"></td>
		</tr>
	</table>
	<table>
		<th:block th:each="elements : ${aryMap}">
			<tr th:each="element : ${elements}">
				<td th:text="${element.key}"></td>
				<td th:text="${element.value}"></td>
			</tr>
		</th:block>
	</table>
	<table>
		<tr th:each="user : ${aryUser}">
			<td th:text="${user.id}"></td>
			<td th:text="${user.name}"></td>
		</tr>
	</table>
</body>
</html>
th:each でループを回せます。
マップはkey、valueでキーと値を取得できます。
HTMLにタグを出力したくない場合は、<th:block>を使います。
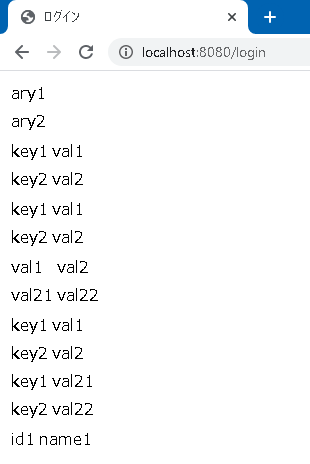
実行すると以下のように表示されます。
Javascript
Javascriptにデータの受け渡しを確認します。LoginControler.javaの中身を以下のように変更します。LoginControler.java
package spring.test.controller;

import java.util.ArrayList;
import java.util.HashMap;
import java.util.List;
import java.util.Map;

import org.springframework.stereotype.Controller;
import org.springframework.web.bind.annotation.RequestMapping;
import org.springframework.web.bind.annotation.RequestMethod;
import org.springframework.web.servlet.ModelAndView;

import spring.test.UserModel;

@Controller
@RequestMapping(value = "/login")
public class LoginControler {

	@RequestMapping(method = RequestMethod.GET)
	public ModelAndView loginGet() {

		ModelAndView mv = new ModelAndView("login");

		List<String> ary = new ArrayList<>();
		Map<String, String> map = new HashMap<>();
		Map<String, String> map2 = new HashMap<>();
		List<Map<String, String>> aryMap = new ArrayList<>();
		List<UserModel> aryUser = new ArrayList<>();

		ary.add("ary1");
		ary.add("ary2");

		map.put("key1", "val1");
		map.put("key2", "val2");

		map2.put("key1", "val21");
		map2.put("key2", "val22");

		aryMap.add(map);
		aryMap.add(map2);

		UserModel user = new UserModel();
		user.setId("id1");
		user.setName("name1");
		user.setAry(ary);
		user.setMap(map);
		user.setAryMap(aryMap);

		aryUser.add(user);

		mv.addObject("aryUser", aryUser);

		return mv;
	}
}
test.htmlの中身を以下のように変更します。
test.html
<!DOCTYPE html>
<html xmlns:th="http://www.thymeleaf.org">
<head>
<meta charset="UTF-8">
<title>ログイン</title>
<script type="text/javascript" th:inline="javascript">
	var str = "";

	var users = /*[[${aryUser}]]*/null;

	var user = users[0];

	str += user.id + ":" + user.name;

	for(let val of user.ary){
		str += ";" + val;
	}

	Object.keys(user.map).forEach(function (key) {
		str += "+" + key + "-" + user.map[key];
	});

	for(let map of user.aryMap){
		Object.keys(map).forEach(function (key) {
			str += "*" + key + "-" + map[key];
		});
	}

	window.onload = function() {
		document.getElementById("id1").innerHTML = str;
	}
</script>
</head>
<body>
	<div id="id1">Hello</div>
</body>
</html>
実行すると以下のように表示されます。

画面表示時にJavascriptは以下のようになります(改行を入れています)。
nullと書いた部分が消え、連携したデータが展開されます。
<script type="text/javascript">
	var str = "";

	var users = [{"id":"id1","name":"name1",
		"ary":["ary1","ary2"],
		"map":{"key1":"val1","key2":"val2"},
		"aryMap":[{"key1":"val1","key2":"val2"},{"key1":"val21","key2":"val22"}]}];

	var user = users[0];

	str += user.id + ":" + user.name;

	for(let val of user.ary){
		str += ";" + val;
	}

	Object.keys(user.map).forEach(function (key) {
		str += "+" + key + "-" + user.map[key];
	});

	for(let map of user.aryMap){
		Object.keys(map).forEach(function (key) {
			str += "*" + key + "-" + map[key];
		});
	}

	window.onload = function() {
		document.getElementById("id1").innerHTML = str;
	}
</script>
属性
属性値のデータ連携をやってみます。ソースは以下のように変更します。LoginControler.java
package spring.test.controller;

import org.springframework.stereotype.Controller;
import org.springframework.web.bind.annotation.ModelAttribute;
import org.springframework.web.bind.annotation.RequestMapping;
import org.springframework.web.bind.annotation.RequestMethod;
import org.springframework.web.servlet.ModelAndView;

import spring.test.UserModel;

@Controller
@RequestMapping(value = "/login")
public class LoginControler {

	@RequestMapping(method = RequestMethod.GET)
	public ModelAndView loginGet(@ModelAttribute("UM") UserModel userModel) {
		userModel.setId("初期値");
		ModelAndView mv = new ModelAndView("login");
		mv.addObject("cls", "CLASS");
		return mv;
	}

	@RequestMapping(method = RequestMethod.POST)
	public ModelAndView loginPost(@ModelAttribute("UM") UserModel userModel) {

		String id = userModel.getId();
		ModelAndView mv = new ModelAndView("login");
		if (id.equals("abc")) {
			userModel.setName("ABCさん");
			mv.addObject("msg", "ログイン成功");
		} else {
			userModel.setName("");
			mv.addObject("msg", "ログイン失敗");
		}
		return mv;
	}
}
test.html
<!DOCTYPE html>
<html xmlns:th="http://www.thymeleaf.org">
<head>
<meta charset="UTF-8">
<title>ログイン</title>
</head>
<body>
	<form th:action="@{/login}" method="post" th:object="${UM}">

		ID: <input type="text" th:field="*{id}" th:class="${cls}" />
		<input type="text" th:field="*{name}"  th:attr="class=${cls}" disabled />
		<BR />
		<input type="submit" value="ログイン" />
		<BR />
	</form>
	<span th:text="${msg}"></span>
</body>
</html>
属性は属性の頭にth:を付けるか、th:attr="属性名=属性値" でデータを連携することができます。
実行すると以下のようにJavaでセットしたものがHTMLに出力されます。
Javaでなにもセットしなかった場合、その属性は出力されません。
実行時の該当部分のHTML(GET)
	ID: <input type="text" class="CLASS" id="id" name="id" value="初期値" />
	<input type="text" disabled class="CLASS" id="name" name="name" value="" />
実行時の該当部分のHTML(POST)
	ID: <input type="text" id="id" name="id" value="初期値" />
	<input type="text" disabled id="name" name="name" value="" />
ページのトップへ戻る